
Building a redundant iSCSI and NFS cluster with Debian - Part 1
Updated:
Note : This page may contain outdated information and/or broken links; some of the formatting may be mangled due to the many different code-bases this site has been through in over 20 years; my opinions may have changed etc. etc.
It’s been a while now since I last updated this blog with any decent material so I thought I’d dust off some of my notes on building a redundant iSCSI and NFS SAN using Debian Etch.
The following post takes the form of a “HOWTO” guide - I’ll include all the relevant commands, configuration files and output produced so you can follow along. This is the first part of the series; I’ll post the different sections in phases, each covering a different part of the setup. The plan is to cover all this in 5 (possibly 6) separate posts, with the following content :
Part 1 - Overview, network layout and DRBD installation
Part 2 - DRBD and LVM
Part 3 - Heartbeat and automated failover
Part 4 - iSCSI and IP failover
Part 5 - Multipathing and client configuration
Part 6 - Anything left over!
So, this being part one, I’ll start with a quick overview of what I’m trying to achieve here :
Cluster overview
The cluster will consist of 2 storage servers, providing iSCSI and NFS services to a number of clients, over floating IP addresses and from a replicated pool of storage. This storage will be used for file sharing (NFS), and block devices (iSCSI) - although you could add any kind of service on top of the cluster; an obvious option would be to provide SMB (Microsoft Windows file services), although I won’t explore that particular avenue.
This will be replicated with DRBD, and managed using LVM2. I’ll also be using multipathing to the storage, so that a component (NIC, switch, cable etc.) can fail in one channel but the storage will still be accessible. Failover and cluster management will be provided by the Linux-HA project.
The distribution I’m using is Debian Etch (4.0), although most of the configuration files and commands used will work on any distro, although file locations and the package management commands will obviously differ.
Network layout
The two storage nodes (which I’ll call “otter” and “weasel”) will have the following 4 network interfaces configured :
- eth0: 172.16.1.x -Management interface (the address we SSH into to manage the system)
- eth1: 10.0.0.x - This is for data replication and heartbeat between the two nodes, and will be via a cross-over cable connected directly between the two servers
-
eth2 and eth3: 192.168.1.x - This is the storage network, clients will connect to this for their storage. And the client (which I’ll call “badger”) will have the following 3 network interfaces configured :
- eth0 : 172.16.1.x - Management / public interface
- eth1 and eth2 : 192.168.x.1 - Storage network (where we access the iSCSI and NFS storage). These will use 192.168.1.1 and 192.168.2.1, both with a netmask of 255.255.255.0 to ensure that requests go to the correct interface when using multipathing (more on that later). In a real-world scenario, these would be on physically different NICs, and would also be on separate switches - particularly the multipathed storage interfaces. Utilising the different private ranges makes it easier to see at a glance what is going on, and makes trouble-shooting a lot easier. It’s also obviously a good idea to separate your storage network from the rest of your regular network traffic.
Of course, there is nothing stopping you from utilising virtual NICs and having each address on eth0:1, eth0:2 and so on. Obviously, GigE or higher would be required in a production network, but there’s nothing stopping you from using 100Mb in a test/development environment. Just don’t expect stellar performance!
There will also be a null-modem cable connected between the two serial ports on each storage node. This is to supplement the network heartbeat, and will help avoid the problem of “split-brain” that can occur in clusters. If there was a problem with the heartbeat network - the switch failing, for instance - both nodes would then see the other as failed, and try to assume the master role. Having a secondary heartbeat connection between the nodes will help avoid this problem - particularly as it is a “straight-through” connection, and does not rely on any intermediate devices such as a network switch.
At this point, a diagram might be in order - you’ll have to excuse my “Dia” skills, which are somewhat lacking!
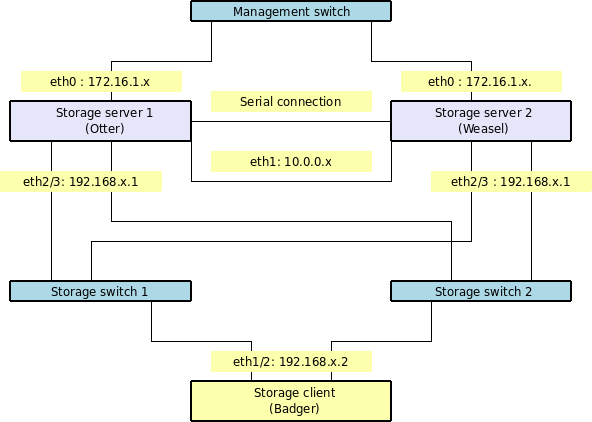
This diagram shows all the important connections between the various hosts, so hopefully this will make things a little clearer. You can see that with this architecture, we could loose one storage server or one switch, and we’d still have a valid path to the storage from our client.
The Underlying storage
Storage-wise, I have set up each system with software RAID, and have created a volume “md3” for use as our underlying clustered storage. This could be any combination of RAID levels, or you could even rely on a plain disk partition (sda3 etc.). The important thing is that there is nothing else on top of this - no volume manager or anything else managing it. These two volumes should also be identically sized, and ideally should have similar performance characteristics - for best results, it’s advisable to use identical systems.
You can obviously adapt and tweak these details to suit your environment; I’m merely pointing them out here so you have a standard that you can follow along with the examples.
Setup
To start with, set up your two storage nodes and configure networking. You’ll need to set up the management interface (eth0) so you can SSH into both systems, and set up the heartbeat/replication interface (eth1) as well. Assuming each host can then ping the other on both interfaces, you’re good to start.
If you’re going to add the serial connection as well (which is advisable, although optional) simply hook a null-modem cable up to the serial ports of both storage servers. You’ll then need to test the connection, so on one storage server, run the following command :
cat </dev/ttyS0
And then on the other storage server, run :
echo "Hello, world!" >/dev/ttyS0
You should see “Hello, world!” pop up on the first server.
DRBD - Distributed Replicated Block Device
The first thing to get going is DRBD - this is the layer that will replicate block storage between the two nodes. Any change made to the storage on one will automatically be propogated over to the other, keeping them in perfect synchronisation. The idea here is that if there is a failure on one node, the other can pick up exactly where the other left off, with minimal interruption to the client.
DRBD uses an active/passive model: One node is the primary node and will be active handling requests; the other will be the secondary and will not be actively serving requests but will have the changes replicated to it. When the primary fails, we can “promote” the secondary to primary and continue. When the failed primary comes back up, it will be demoted to a secondary, and re-synch with the new master.
I’m assuming here that you have an up to date Debian etch system, with the appropriate build packages installed (‘sudo apt-get install build-essential’ should pull in most of this). Debian does ship a binary module of DRBD, but it’s better to build your own as it will then work on all kernels, not just the stock one :
sudo apt-get install drbd0.7-utils drbd0.7-module-source dpatch
cd /usr/src
sudo tar -zvxf drbd0.7.tar.gz
This produces some output as the source is unpacked :
modules/
modules/drbd/
modules/drbd/debian/
...
... and so on
...
Now we’re ready to build :
cd /usr/src/modules/drbd
sudo module-assistant prepare
You’ll then see output similar to the following, but it will likely differ depending on your kernel version :
Getting source for kernel version: 2.6.18-6-xen-686</div> Once this is done, you're ready to build...
apt-get install linux-headers-2.6.18-6-xen-686
Reading package lists... Done
Building dependency tree... Done
The following extra packages will be installed:
linux-headers-2.6.18-6-xen
The following NEW packages will be installed
linux-headers-2.6.18-6-xen linux-headers-2.6.18-6-xen-686
0 upgraded, 2 newly installed, 0 to remove and 4 not upgraded.
Need to get 3481kB of archives.
After unpacking 26.5MB of additional disk space will be used.
Do you want to continue [Y/n]? Y
sudo module-assistant automatic-install drbd0.7-module-sourceYou'll then get a menu-driven system that will build the module for you.
- * Select PREPARE
* You'll see "Press Return to continue..."
* Choose SELECT, and you'll then see a long list of modules that you can build. Go down to drbd0.7-module, and press the space key to select it. Tab out to the OK button and press Enter.
* At the next menu, select "BUILD", and you'll see a dialog showing the build progress. At the end, you'll see another dialog box, asking if you want to install the module. Say "Yes" here, and then you can exit the program (tab to CANCEL, then select EXIT)