
Solaris 11 Review
Updated:
Note : This page may contain outdated information and/or broken links; some of the formatting may be mangled due to the many different code-bases this site has been through in over 20 years; my opinions may have changed etc. etc.
I’ve finally had the chance to devote some time to experimenting with some of the new features in Solaris 11. This article is really just intended as a walk-through of my first few weeks using Solaris 11 - a kick of the tyres, so to speak. There is far too much that is new for me to cover everything, so I’ll be adding to this article and updating this site as I go through it. I’m also assuming the reader is familiar with Solaris 10; if you feel some parts need clarification, or if I’ve skipped over something you’d particularly like covered, feel free to let me know!
Download
I am a little unclear as to the new licensing restrictions around Solaris 11. My understanding (Caveat: I Am Not A Lawyer) is that it is free to use for personal and non-commercial purposes, but anything after a 30-day trial period must be licensed if you intend to use it for any kind of commercial purposes - this includes development and testing environments. You also do not get access to patches or software updates without a support contract; sadly that now includes things like BIOS and firmware updates that used to be freely available in the Sun days. All part of the new regime, I suppose - we all have to get used to contributing to Larry’s yacht fund now.
Heading on over to Oracle’s online store reveals that a “Oracle Solaris Premier Subscription for Non-Oracle Hardware (1-4 socket server)” starts at £672.00, which does compare favourably with Red Hat Linux. Excluding the 2-socket tier, an equivalent 4-socket Red Hat license would set you back around £1,000 and only includes a license for 1 virtual machine. More details of what’s included in the support offering are at http://www.oracle.com/us/support/systems/operating-systems/index.html.
Update : An anonymous reader provides some clarification - it looks like it may not be such a great deal after all :
The list price comparison to RHEL intrigued me. I think the Solaris price is higher than £672/$1000 for the 4 socket example you’re giving as according to the Oracle store description page for the 1-4 socket non-Oracle option: “Please note, this subscription is based on the number of sockets in the system you need to support, when ordering enter the number of sockets in the quantity field. So that’d be £672 * 4 = £2688 (or $4000). I’m assuming premier is the same sort of service + SLAs on both. The equivalent to the single socket £672/$1000 subscription would be the RHEL 2-socket premium subscription at $1299/yr. Hopefully I’m not missing anything here.
I would be interested to hear of any experiences of Oracle’s support when using non-Oracle hardware, as to date (apart from some non-production environments running on HP ProLiant systems) everything I have run Solaris on has been a Sun/Oracle SPARC or x64 system, and the OS support was included under a larger company support contract. Update 2 : There’s some experience of Solaris on HP kit in the comments below.
Anyway, the first step is to download the software and unlike previous Solaris releases, there’s now a variety of different installation media so you have to pick the correct one for your needs. The available downloads are :
- Text Install : This is very similar to the old Solaris text-mode installs (SPARC and x86) and even has the same colour-scheme and
F2_Continueshortcuts down the bottom. Takes me right back to installing Solaris 8 on old Pentium systems! - Automated Installer : This provides a hands-free network installation system, and replaces the old Jumpstart system. You need to have your own IPS repository (more on that later) set up, or have access to the Internet so you can reach Oracle’s IPS repository.
- Live Media : This is only available for x86 systems, and is very similar to the Linux live environments on Ubuntu and Fedora etc. It lets you run the system off the CD and experiment with it before actually installing it. It’s pretty slow and you’ll need a lot of memory so I personally didn’t find it of much use other than to check hardware compatibility and so on.
- Repository Image : Unlike previous Solaris releases, the installation media does not contain all available packages. Instead, it contains a smaller subset of software which will allow you to get a basic system up and running. After that, you need to connect to Oracle’s pkg.oracle.com server to download other packages, or use this image to either setup a local IPS server on your network (or mount it and use it as a local repository).
- USB Install Images : Again, only available for x86. I didn’t test this out as I didn’t have a need for it, but it would be a useful addition to the Solaris sysadmin’s toolbox.
- Virtual Machine Downloads : These are VM images that can be imported directly into a variety of hypervisors - could be useful for getting started quickly, but most admins will either be using the text or automated installers.
There’s also a Oracle Solaris 11 Preflight Application Checker available, which checks an application running on Solaris 10 and indicates whether it should run without problems on Solaris 11. However, given the Solaris binary compatibility guarantee it’s unlikely you’d encounter problems. In any case, you could always run a Solaris 10-branded zone under Solaris 11 - indeed, creating a Solaris 10 zone from a running system (using flash images) is a supported configuration and process.
Installation
I grabbed the x86 text installation images and installed a system using Oracle Virtualbox. As with Solaris 10, the boot menu (grub) lets you choose an install over a local terminal or serial ports. The latter option is particularly useful in an environment using Sun/Oracle servers without a graphics card - while you can use iLOM/ALOM, going straight to the serial port is much faster.
The setup starts off much the same as Solaris 7 onwards, with the usual region/keyboard selection, and then you get presented with a new menu :
1 Install Oracle Solaris
2 Install Additional Drivers
3 Shell
4 Terminal Type (currently sun-color)
5 Reboot
Choosing option 3 (Shell) drops you into a basic rescue-like environment, and typing exit (or hitting Ctrl-D) at any point returns you to menu. This environment is extremely useful for performing emergency maintenence or recover tasks and while you could always use boot -s from older Solaris installation media, it’s is a very welcome addition to have it so easily available. In this shell environment svcadm enable ssh starts a SSH server, and if you create a new user (you can’t login as root), you can also login over network.
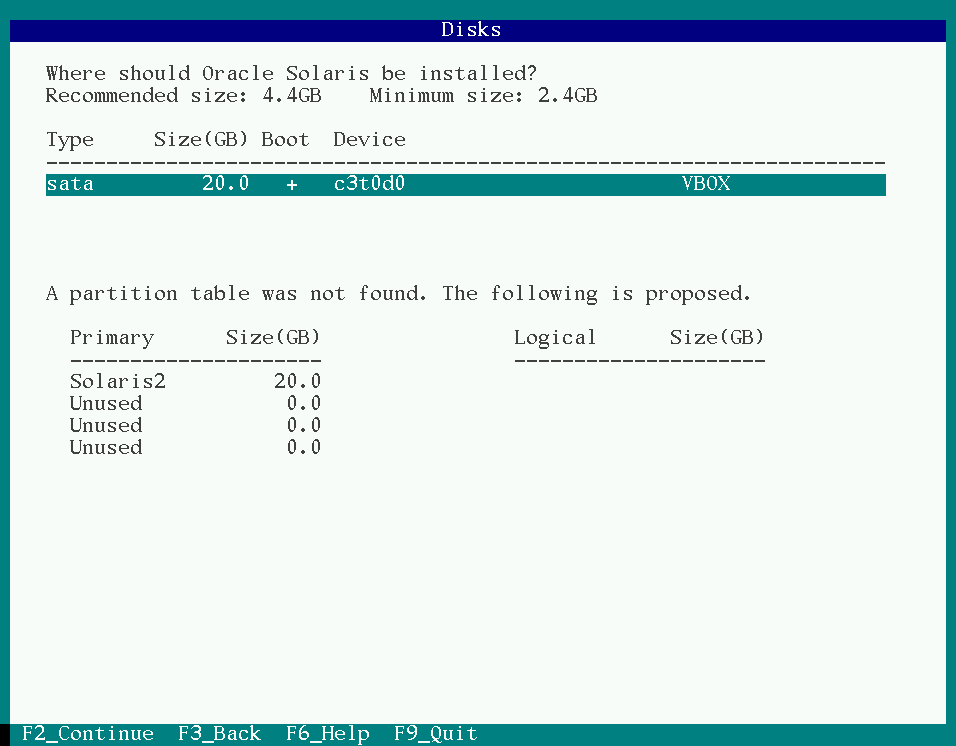
The next screen that has noticably changed is the disks screen. UFS has been completely removed as an option, so instead of choosing your slices for filesystems, you now only get to pick which slice should be used for the ZFS root pool. It is recommended that you use the entire disk/LUN where possible, as this lets ZFS make much better use of the underlying volume (see http://www.solarisinternals.com/wiki/index.php/ZFS_Best_Practices_Guide for more information).
There is no choice as to ZFS filesystem layout, although as it can so easily be modified it really doesn’t matter. Whatever slice or LUN you select is assigned to the rpool volume.
After the network configuration (which has changed slightly but still provides the same choices of DHCP, Manually or None), you reach the User creation step. This again is noticably different: Firstly, it now enforces password complexity. Secondly, you have to create a new user account as well. The traditional root account is now a role, and you can’t login directly as root. Like most Linux distros, the first user account created has the ability to use sudo/RBAC to work as root when needed.
After this step, the installation starts in earnest. The install is very quick, and after the slow initial reboot (when it loads smf service descriptions), you can login.
First boot
Boot output is very minimal by default, after the grub menu you just get:
SunOS Release 5.11 Version 11.0 64-bit
Copyright (c) 1983, 2011, Oracle and/or its affiliates. All rights reserved.
Loading smf(5) service descriptions: 191/191
Configuring devices.
Hostname: solaris
solaris console login:
And then unless you have set up a FQDN, you’ll see the usual sendmail barfing. Seeing as I always kill sendmail first thing (seriously, why do we have to put up with sendmail in this day and age?), that’s not a problem. My first step with a new Solaris system is to enable verbose booting - you can modify this on an x86 system by changing /rpool/boot/grub/menu.lst kernel line as follows :
kernel$ /platform/i86pc/kernel/amd64/unix -B $ZFS-BOOTFS -v -m verbose
This provides much more verbose kernel messages, as well as showing each SMF service as it comes up.
Logging in shows the first big change in the userland - bash is now default shell :
Oracle Corporation   SunOS 5.11   11.0  November 2011
mark@solaris:~$ uname -a
SunOS solaris 5.11 11.0 i86pc i386 i86pc```
Even if you’re a hardened csh or zsh fan, it can’t be denied that bash is pretty much the standard across a mixed Unix/Linux environment these days, and as an interactive shell is a massive improvement over /bin/sh.
As mentioned above, the first user created has full Sudo access, as well as a pretty comprehensive set of RBAC authorisations :
mark@solaris:~$ sudo -l
Password:
User mark may run the following commands on this host:
  (ALL) ALL
For full pfexec permissions (the default doesn’t allow you to disable services, for instance) you can re-add the Primary Administrator profile as per older releases and then pfexec becomes funtionally equivalent to sudo :
echo 'Primary Administrator:suser:cmd:::*:uid=0;gid=0' >> /etc/security/exec_attr
echo 'Primary Administrator:::All administrative tasks:auths=solaris.*;solaris.grant;help=RtPriAdmin.html' >> /etc/security/prof_attr
sudo usermod -P "Primary Administrator" mark
And then I now have all available authorisations :
mark@solaris:~$ auths
solaris.*
Filesystems
The default layout is separate /, /var, /tmp (swap-backed as usual), /export, /export/home and individual homes, all mounted under /home :
mark@solaris:~$ df -h
Filesystem             Size   Used  Available Capacity  Mounted on
rpool/ROOT/solaris      20G   1.5G        16G     9%    /
/devices                 0K     0K         0K     0%    /devices
/dev                     0K     0K         0K     0%    /dev
ctfs                     0K     0K         0K     0%    /system/contract
proc                     0K     0K         0K     0%    /proc
mnttab                   0K     0K         0K     0%    /etc/mnttab
swap                   1.1G   1.3M       1.1G     1%    /system/volatile
objfs                    0K     0K         0K     0%    /system/object
sharefs                  0K     0K         0K     0%    /etc/dfs/sharetab
/usr/lib/libc/libc_hwcap1.so.1
                        18G   1.5G        16G     9%    /lib/libc.so.1
fd                       0K     0K         0K     0%    /dev/fd
rpool/ROOT/solaris/var
                        20G   215M        16G     2%    /var
swap                   1.1G     0K       1.1G     0%    /tmp
rpool/export            20G    32K        16G     1%    /export
rpool/export/home       20G    32K        16G     1%    /export/home
rpool/export/home/mark
                        20G    34K        16G     1%    /export/home/mark
rpool                   20G    39K        16G     1%    /rpool
/export/home/mark       16G    34K        16G     1%    /home/mark
This is a very sensible layout choice, and thanks to the flexibility of ZFS can be modified easily if needed. It looks like de-duplication, compression etc. are off by default for each filesystem, but can obviously be turned on if needed. It’s using the default ZFS block size of 128K, and as with all ZFS systems you really need plenty of memory:
$ echo "::memstat" | sudo mdb -k | egrep "ZFS|Summary|^-"
Page Summary        Pages            MB               %Tot
------------        ---------------- ---------------- ----
ZFS File Data       117824           460              45%
The ZFS ARC uses most of your free memory and while it should relinquish it if needed, experience shows it’s not optimal in some situations and can lead to thrashing. My experience is that you need a minimum of 2Gb for practical usage - while some documentation indicates 1Gb is the minimum, 2Gb and above leads to a much more usable system. Of course, you can also limit the ARC to a fixed size using zfs_arc_max, which is might be a good idea if you are running a memory-intensive application and know it’s average working set size. If you’re migrating from a previous Solaris release and still need to attach to legacy volumes, SVM is also available but it’s not installed by default; you need to add it from a package repository.
Sadly, the ZFS webconsole (which was one of my favourite little-known features of Solaris 10, and turned a Solaris install into a fantastic storage server) is no longer present. This is presumably due to Oracle selling dedicated ZFS appliances.
The userland
I’m pleased to see compared to the horrors of past Solaris releases, a NMAP run against a newly installed system system shows minimal ports open, just SSH and portmapper.
The userland feels nicely updated, both in terms of the included packages and updates to the included utilities. For instance, there’s a set of GNU coreutils under /usr/gnu, and now even /usr/bin/ls supports the --color=<when> argument, and tar also natively supports the -z and -j options for Gzip and Bzip compression - finally, no need to pipe it through gunzip first!
Sendmail is still there, and there’s no Postfix or Exim available in the official repositories so you’ll need to head off to OpenCSW/SunFreeware, or install your own packages if you want to replace it.
There’s a full install of Apache 2.2.20 under /usr/apache/2.2 and PHP can be easily added from the official repositories. Java 1.6 is provided along with a JDK and Perl is at version 5.12.3. SFW now looks as though it’s been merged into the main system, as all the files under /usr/sfw/bin are now symlinks pointing to /usr/bin. This means you also get tools like gtar, gmake and ncftp available by default.
Configuration
There are massive changes to how configuration is now handled in Solaris 11. I can’t stress enough how big a change this is - it seems like Oracle are trying to move administrators away from the traditional Unix approach of directly editing config files, and instead using tools to manipulate them. In many cases the config files are still there, but are either backing stores for configuration information, or are dynamically generated by the SMF framework. In this way, it starts to feel more like AIX (or, to a lesser extent, newer Windows Server products) and has massive implications on the way you manage your systems. It means that there is plenty of room for confusion and a lot of 3rd party management tools (including configuration management systems like CfEngine, Puppet or Chef) will need re-working to handle the new way of doing things.
A good example of this is network configuration : In Solaris 11 the /etc/resolv.conf is automatically populated by the svc:/network/dns/client service and manual edits will be lost when the service is restarted. To set values for the nameservers and other information, you must use svccfg now :
$ sudo svccfg -s dns/client
svc:/network/dns/client> setprop config/nameserver = (192.168.16.61)
svc:/network/dns/client> listprop config
config                      application
config/value_authorization astring     solaris.smf.value.name-service.dns.client
config/domain              astring     example.net
config/nameserver          net_address 192.168.16.61
svc:/network/dns/client> exit
$ sudo svcadm refresh dns/client
Nsswitch is also handled through svcs. So when you want to use DNS, instead of copying nsswitch.dns to nsswitch.conf, you again need to use svccfg :
$ sudo svccfg -s name-service/switch
svc:/system/name-service/switch> setprop config/default = files
svc:/system/name-service/switch> setprop config/host = "files dns"
svc:/system/name-service/switch> exit
$ sudo svcadm refresh name-service/switch
Network interface names have changed - by default, Solaris 11 now uses net0 and so on instead of the driver-specific e1000g0, bge0 and others. System ID configuration (hostname) is also in SMF. The old methods of using /etc/hostname.
$ dladm show-phys
LINK              MEDIA                STATE      SPEED  DUPLEX    DEVICE
net0              Ethernet             up         1000   full      e1000g0
$ ipadm show-addr
ADDROBJ           TYPE     STATE        ADDR
lo0/v4            static   ok           127.0.0.1/8
net0/_b           dhcp     ok           192.168.16.237/24
lo0/v6            static   ok           ::1/128
net0/_a           addrconf ok           fe80::a00:27ff:fea1:e305/10
For instance, to create a new static IP address on a persistent interface which persists across boots, you’d do something like :
sudo ipadm create-addr -T static -a 192.168.1.23/24 net0/static
However, if the interface is temporary (e.g. a DHCP interface), you’ll need to delete it and re-create it - seehttp://docs.oracle.com/cd/E23824_01/html/821-1458/gljtt.html for an overview, as this seriously tripped me up to start with.
In short, be prepared for several days of serious culture shock, and a LOT of reading through http://docs.oracle.com/cd/E23824_01/html/821-1458/toc.html and related documentation at http://www.oracle.com/technetwork/server-storage/solaris11/documentation/index.html.
IPS
This is another massive change, although it is one that should have most Solaris administrators dancing for joy. The Image Packaging System completely replaces the old SysV software installation process, and patching. In older Solaris releases, patches were managed separately from package installation; they contained fixes for problems and only included parts of packages. This used to lead to all kinds of problems, and was my main complaint with Solaris. For instance, if you installed a patch but then later installed a package from the installation media that the patch had a fix for, you’d need to re-install the patch.
Add to this the tendancy for seemingly unrelated interactions when patching (e.g. kernel patches somehow stomping on sendmail configurations), and many sites only applying fixes when needed thereby creating a massive chain of dependencies for future patches - which typically only surfaced when you had some emergency problem and needed to apply a patch in a hurry - you had a nightmare of a system.
IPS aims (and succeeds) in solving all of these problems as well as tying incredibly well into ZFS snapshots to provide you with a far more consistent and easy to use software installation, patching, and rollback process. However, the old pkg tools are available and you can still install SysV packages so you can add OpenCSW / Sun Freeware and other packages as needed. There is a good set of documentation at http://www.oracle.com/technetwork/server-storage/solaris11/technologies/ips-323421.html.
If you are familiar with Linux systems, a reasonable analogy is that IPS fills the same kind of role that YUM or APT do in the Red Hat or Debian world.http://pkg.oracle.com/ is the official Oracle repository, and it has a web interface that lets you search for software. If you have a support contract, you also gain access to the updates repository which contains newer versions of the bundled software with patches and bug fixes.
However, I encountered frequent network errors and stalls when using it :
~$ pkg search ruby
pkg: Some repositories failed to respond appropriately:
solaris:
Framework error: code: 56 reason: Recv failure: Connection reset by peer
URL: 'http://pkg.oracle.com/solaris/release/solaris/search/1/False_2_None_None_%3A%3A%3Aruby'.
This may have been caused by transient network errors or a problem at Oracle’s end, but it still seems like good advertisement for having local repository especially as others seem to have reported the issue a few times in the past. I can only hope that the situation improves with time.
Fortunately, setting up a local repository is a pretty simple affair. You download 2 ISOs, and concatanete them to form a dual-layer DVD image :
$ cat sol-11-1111-repo-full.iso-a \
  sol-11-1111-repo-full.iso-b > sol-11-1111-repo-full.iso
This results in a 6.1G file which you can either burn to DVD or mount using lofiadm. Once you have it mounted, you can set up a pkg server for the rest of your network (see the README included for details), but I instead added them as a local repository just for use by this one system:
$ sudo zfs create rpool/export/pkgs
$ sudo lofiadm -a sol-11-1111-repo-full.iso
$ mkdir /tmp/pkgs
$ sudo mount -F hsfs /dev/lofi/1 /tmp/pkgs
$ sudo rsync -aP --progress /tmp/pkgs/ /export/pkgs/
$ sudo umount /tmp/pkgs
$ sudo lofiadm -d /dev/lofi/1
I then had a full copy of the packages under the ZFS filesystem /export/pkgs, which I could also add compression to in order to save space. I then removed all of the default package origins and mirrors for a publisher, and added a new origin pointing to my local repository :
$ sudo pkg set-publisher -G '*' -M '*' -g file:///export/pkgs/repo solaris
$ sudo pkg refresh --full
I could then can install additional software, e.g.
$ sudo pkg install ruby-1.8
$ sudo pkg install php-52 php-apc php-idn \
  php-memcache php-mysql php-pear php-pgsql \
  php-suhosin php-tcpwrap php-xdebug
There’s a pretty complete AMP stack available as well as supporting technologies :
- PHP 5.2.17 and full set of extensions including Suhosin and APC
- Ruby 1.8.7 (and jRuby 1.1.3)
- Tomcat 6.0.33
- Squid 3.1.8
- MySQL 5.1.37
- Webmin 1.510
- Lighttpd 1.4.23
Surprisingly, the bundled version of MySQL is old (5.1) although newer versions are available through MySQL.com and SFW/CSW. For compiling your own software, GCC 3.4.3 and 4.5.2 are provided although Oracle Workshop compilers are free and arguably produce much better code, particularly on Sparc.
Patching
This is the area where IPS shines. To start with, there are now no longer separate patches - you simply run pkg update, and your entire system is brought up to date. So far, so good. However, the magic really starts when IPS brings together ZFS snapshots and boot environments - it leaves comparable systems like YUM in the dust.
For instance, suppose you were installing a new package, or upgrading your system. You can create a snapshot of your current boot environment prior to making the changes for rollback purposes, or clone your current BE and install the packages into the clone, rebooting to make the changes active. In this way, it’s similar to the old LiveUpgrade system but rather than requiring separate disks (or temporarily splitting mirrors), it’s now all handled with ZFS snapshots and happens more or less instantly with minimal administrator overhead. Snapshots have practically zero overhead, and there’s really no reason not to take full advantage of this.
As an example, here’s how you would create a new boot environment and install a new package into it :
$ sudo pkg install --be-name gcc-install gcc-45
           Packages to install:   4
       Create boot environment: Yes
Create backup boot environment:  No
DOWNLOAD                                  PKGS       FILES    XFER (MB)
Completed                                  4/4   1030/1030  123.6/123.6
PHASE                                        ACTIONS
Install Phase                              1270/1270
PHASE                                          ITEMS
Package State Update Phase                       4/4
Image State Update Phase                         2/2
A clone of solaris exists and has been updated and activated.
On the next boot the Boot Environment gcc-install will be
mounted on '/'.  Reboot when ready to switch to this updated BE.
$ beadm list
BE          Active Mountpoint Space  Policy Created
--          ------ ---------- -----  ------ -------
gcc-install R      -          2.97G  static 2012-03-07 16:16
solaris     N      /          143.0K static 2012-03-07 10:24
This process cloned the currently active solaris BE and named it gcc-install. It then installed the packages into it, and will be activated when the system reboots.
If you want to create a snapshot of your current environment prior to making changes you can always do it manually with a simple beadm create, and other filesystems or ZFS pools can be snapshotted as usual.
Zones
As you’d expect, Solaris Zones (container-based virtualisation) have been tightly integrated with the new features and in doing so have gained some really nice new features. Possibly the biggest change is the new crossbow networking stack which allows you to make use of fine-grained network utilisation policies. Now, when you create and boot a zone you’ll see a virtual NIC (VNIC) created :
$ sudo dladm show-vnic
LINK                OVER         SPEED  MACADDRESS        MACADDRTYPE       VID
myzone/net0         net0         1000   2:8:20:24:b9:d2   random            0
This VNIC can be modified using zonecfg for the changes to take place persistently, although you can use dladm in the globalzone to modify settings on the fly. As an example, here’s a quick session where I reduced the maximum bandwidth available to this VNIC to 100Mb/s, as well as a help listing showing the available parameters :
zonecfg:myzone> select anet linkname=net0
zonecfg:myzone:anet> help
The 'anet' resource scope is used to configure a virtual datalink that will automatically be added to the zone.
Valid commands:
    set linkname=<datalink name>
    set lower-link=<datalink name>
    set allowed-address=<IP-address>,...
    set defrouter=<IP-address>,...
set defrouter is valid if the allowed-address property is set, otherwise it must not be set
    set allowed-dhcp-cids=<client-ID or DUID>,...
    set link-protection=<comma-separated list of protections>
    set mac-address=<mac-address>
    set mac-prefix=<mac-prefix>
    set mac-slot=<mac-slot>
    set vlan-id=<vlan-id>
    set priority=<high|medium|low>
    set rxrings=<Number of receive rings>
    set txrings=<Number of transmit rings>
    set mtu=<mtu>
    set maxbw=<full duplex bandwidth of the link>
zonecfg:myzone:anet> set maxbw=100M
And then after commiting this change and rebooting the zone :
$ sudo dladm show-vnic
LINK                OVER         SPEED  MACADDRESS        MACADDRTYPE       VID
myzone/net0         net0         100    2:8:20:24:b9:d2   random            0
It’s worth pointing out that although VNICs will mainly be encountered in zones, there is no reason you have to use zones to make use of them. This means you could for instance create a new VNIC on your system, and then bind your Apache webserver to it for instance.
Also, a small but welcome change is that you can now run a NFS server inside a non-global zone!
Desktop
From a text-only install of Solaris 11, you can add the GNOME 2-based desktop environment using sudo pkg install solaris-desktop. There’s not much to say here really, if you’ve used GNOME 2.x, it won’t come as much of a shock to you. There are a couple of nice additions including a SMF applet and related control panel. There’s also a GUI package manager, firewall manager and automated snapshot system called Time Slider integrated into Nautilus - think of Apple’s Time Machine, but built on ZFS.

I can’t honestly say I used the desktop much other than out of idle curiosity; while Solaris 11 could be a useful development workstation OS, I doubt it’ll be winning any new converts over from Linux or the BSDs. Phoronix do have a good overview of the desktop though, if that sort of thing interests you : http://www.phoronix.com/scan.php?page=article&item=oracle_solaris_11&num=1
Wrapup (for now)
There’s a lot more to experiment with including the new load balancer and COMSTAR storage stack, which turns a Solaris 11 system into a storage target, capable of exporting ZFS volumes over pretty much any protocol and transport imaginable - iSCSI, FC, FCoE, Infiniband, Ethernet… Being the huge storage geek, this is obviously of particular interest to me! As time goes on and I’ve had a chance to go over some more of this stuff and integrate it properly into my test environment, I’ll update this site with my progress.
So, based on my short time with Solaris 11 so far, I’d say I’m impressed and that it’s a solid upgrade from Solaris 10. Although the loss of individual configuration files and the traditional unix-way of doing things is a culture shock, in most cases there are sound reasons for doing so. IP and data-link configuration is the obvious area in which the old methods were rapidly becoming clunky and difficult to manage; dladm and ipadm provide a much more consistent and powerful toolset.
IPS combined with ZFS snapshots means greatly reduced downtime and failsafe updating; all my old issues with Solaris patching and package management have been made completely redundant thanks to this system. While some of the other features in Solaris 11 can be pretty much viewed as incremental updates, this is truly revolutionary.
Sadly, due to the licensing changes and the fact that Oracle have pretty much managed to kill off the community around OpenSolaris I can’t see it winning many converts from established Linux shops, but anyone already running Solaris 10 (or previous releases) should find plenty here to compel an upgrade plan…
You could also check out my coverage of upgrading to a beta release here : https://www.markround.com/blog/2014/04/30/solaris-11-dot-2-beta/.