
Getting started with Sensu on Solaris
Updated:
Note : This page may contain outdated information and/or broken links; some of the formatting may be mangled due to the many different code-bases this site has been through in over 20 years; my opinions may have changed etc. etc.
Sensu is a monitoring framework written in Ruby. It’s small and very easy to extend, as well as being extremely scalable. It uses a message bus to communicate with it’s different components (clients, servers, api hosts) as well as external systems such as Graphite, which can be used to produce graphs and store metrics.
It uses a subscription-based model, where clients register with the server, instead of the traditional Nagios-like model where the server requires a long list of clients, checks and other configuration. This makes Sensu particularly well-suited for a fast-changing and dynamic cloud infrastructure, where hosts may be added or removed on a regular basis.
In this tutorial, I’ll show how to install the various components that make up a basic Sensu installation, and the Uchiwa dashboard. In future articles I’ll show how to add checks, manage alerts, and configure a range 3rd party components such as the previously mentioned Graphite.
While the package management details, paths and so on are all Solaris-specific and use my packages, the steps and general principles behind this article should be applicable to other systems. You could also use a different source of packages (Solaris 11.2 will come with a bundled RabbitMQ server for example), or even compile your own manually.
For the sake of this tutorial, I’ll set up all the Sensu server components on a single machine, although there’s no reason why you couldn’t split them up over multiple hosts.
Install RabbitMQ and Redis
Firstly, we need to install two pre-requisites for Sensu - Redis and RabbitMQ. Redis is used by Sensu as a datastore, and RabbitMQ is used to pass messages (check commands, and the results of those checks) between the various components of Sensu and it’s clients.
To get started, add one of my package repositories to your system. You can pick either the /dev or /stable branches, depending on your requirements. See the documentation for more information on how to do this, and the difference between the repository branches.
Once you’ve done that, an install of redis and rabbitmq is simple :
	$ sudo pkg install redis rabbitmq
	           Packages to install:  4
	       Create boot environment: No
	Create backup boot environment: No
	            Services to change:  1

	DOWNLOAD                                PKGS         FILES    XFER (MB)   SPEED
	Completed                                4/4     5189/5189    52.2/52.2    0B/s

	PHASE                                          ITEMS
	Installing new actions                     5690/5690
	Updating package state database                 Done
	Updating image state                            Done
	Creating fast lookup database                   Done
You should now see both services come online :
	$ svcs -a | egrep "(rabbit|redis)"
	online         13:01:22 svc:/network/redis:default
	online         13:01:24 svc:/network/rabbitmq:default
Testing the services
Redis is very easy to test with the “ping” command. If all is working properly, it should reply with “PONG” :
$ redis-cli
127.0.0.1:6379> ping
PONG
127.0.0.1:6379> exit
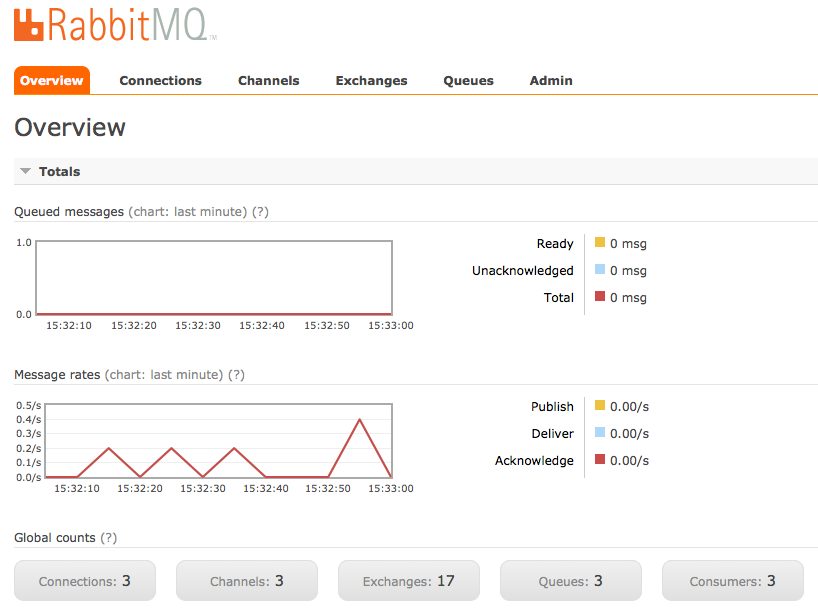
Your RabbitMQ installation can be verified by browsing to the login screen on port 15672 (e.g. http://address_of_your_server:15672). You should see the following :

RabbitMQ creates a default user called “guest”, with the password also set to “guest”. However, it initially restricts access to this account from the local machine. As you’re most likely going to want to administer the RabbitMQ server from another machine (e.g. one with a GUI desktop and web browser), you’ll need to set up access control permitting this.
Following the example in the Rabbit MQ manual, run the following to create a new, blank rabbitmq.config file, and unset the loopback_users configuration item so that all users are permitted to log in remotely :
$ echo "[{rabbit, [{loopback_users, []}]}]." | sudo tee /opt/mar/etc/rabbitmq/rabbitmq.config
$ sudo /sbin/svcadm restart rabbitmq
And after logging in as the default “guest” account, you’ll see the following page :

Configuring RabbitMQ
We now need to create a new “vhost” and user for Sensu to use. You can easily do this through the GUI, although I’ll show how to do it through the command line, so you can just copy & paste. First, create the vhost :
$ sudo rabbitmqctl add_vhost /sensu
Then add the user sensu with the password password123 (obviously, in a production environment, you’d change this to something more secure!) :
$ sudo rabbitmqctl add_user sensu password123
Finally, grant that user full permissions on the sensu vhost :
$ sudo rabbitmqctl set_permissions -p /sensu sensu ".*" ".*" ".*"
If you want to be able to use that account to login to the web interface, you will also need to apply the administrator tag to the account :
$ sudo rabbitmqctl set_user_tags sensu administrator
Although doing this is discouraged for security reasons. If you want to remove the administrator tag after you’ve confirmed you can log in, simply set an empty list of tags :
$ sudo rabbitmqctl set_user_tags sensu
For more information on all these commands, see the rabbitmqctl man page
Install Sensu
Install the server and verify connections
Now we have the basic requirements setup, we can start to install the different components that make up a Sensu installation. Start by installing my sensu-server meta-package, which will pull in Ruby, various libraries, configuration files and a SMF manifest :
$ sudo pkg install sensu-server
You should then see the sensu-server service come online :
$ svcs sensu-server
STATE          STIME    FMRI
online         15:08:32 svc:/network/sensu-server:default
A quick look at the files under /opt/mar/etc/sensu/conf.d will show the reason: The configuration files telling Sensu where and how to connect to Redis and RabbitMQ all have the defaults set to the examples used above (e.g. localhost, with the default password of ‘password123’) :
$ cat /opt/mar/etc/sensu/conf.d/rabbitmq.json
{
  "rabbitmq": {
    "user": "sensu",
    "port": 5672,
    "vhost": "/sensu",
    "host": "localhost",
    "password": "password123"
  }
}
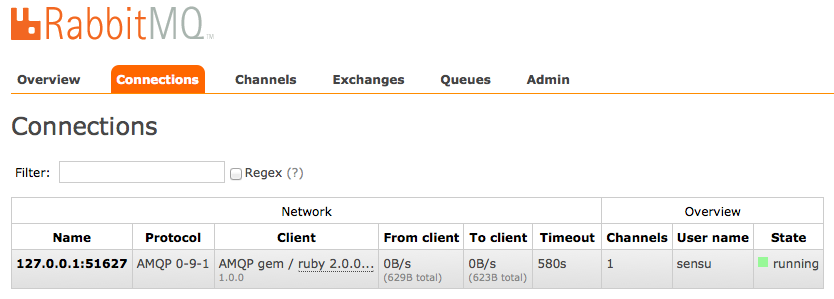
You’ll obviously want to change these credentials in a production setting! You can also verify that the server has started correctly by looking at the RabbitMQ admin console. If you click on the “connections” tab, you’ll see a new connection ftom the sensu server :
Install the API
The next component to install is the API service, which lets other tools communicate with the Sensu server. As before, this is a simple “pkg install” away :
$ sudo pkg install sensu-api
And verify :
$ svcs sensu-api
STATE          STIME    FMRI
online         15:21:49 svc:/network/sensu-api:default
You’ll also see another connection showing up in the RabbitMQ console.
Install the client
We’re installing a client on the same machine to demonstrate this process. Again, one more package to install :
$ sudo pkg install sensu-client
This however will fail to start :
$ svcs -xv
svc:/network/sensu-client:default (?)
 State: maintenance since Thu Jun 12 15:25:25 2014
Reason: Start method failed repeatedly, last exited with status 2.
   See: http://support.oracle.com/msg/SMF-8000-KS
   See: /var/svc/log/network-sensu-client:default.log
Impact: This service is not running.
The reason is simple - it needs a configuration to be present before it will start. If you look at the sample configuration provided (/opt/mar/etc/sensu/conf.d/client.json.example), you’ll see a few things that need to be changed. Copy this file and edit it :
 $ sudo cp /opt/mar/etc/sensu/conf.d/client.json.example /opt/mar/etc/sensu/conf.d/client.json
 $ sudo vi /opt/mar/etc/sensu/conf.d/client.json
And modify the address and hostname fields accordingly. Also, change the “subscriptions” to an empty array (we’ll cover that later). For example, on my host “demo.markround.com” with the IP address of 192.168.0.143, my configuration looks like :
{
  "client": {
    "address": "192.168.0.143",
    "safe_mode": false,
    "name": "demo.markround.com",
    "subscriptions": []
  }
}
Save this file, and then clear the service - you should see it come online immediately :
$ sudo /sbin/svcadm clear sensu-client
$ svcs sensu-client
STATE          STIME    FMRI
online         15:31:15 svc:/network/sensu-client:default
You’ll also see one more connection in the RabbitMQ console, and you’ll also see messages being passed between the components every few seconds :
Wrap-up
You can now use the “sensu-cli” tool (a 3rd party component, but one I’ve bundled with my sensu-common package) to further verify Sensu is up and running. On the first run, it will create a configuration file in your home directory, so you’ll need to enter the same command twice :
$ sensu-cli client list
We created the configuration file for you at /home/mark/.sensu/settings.rb.
You can also place this in /etc/sensu/sensu-cli. Edit the settings as needed.

$ sensu-cli client list
-------
address:  192.168.0.143
safe_mode:  false
name:  demo.markround.com
subscriptions:  []
timestamp:  1402583695
1 total items
We’ll now also install the Uchiwa dashboard, to provide a graphical view into Sensu. This is a 3rd party tool written in Node.js and is a big improvement over the default sensu-dashboard tool. Installation is straightforward from my package repositories :
$ sudo pkg install uchiwa
$ svcs uchiwa
online         13:51:22 svc:/network/uchiwa:default
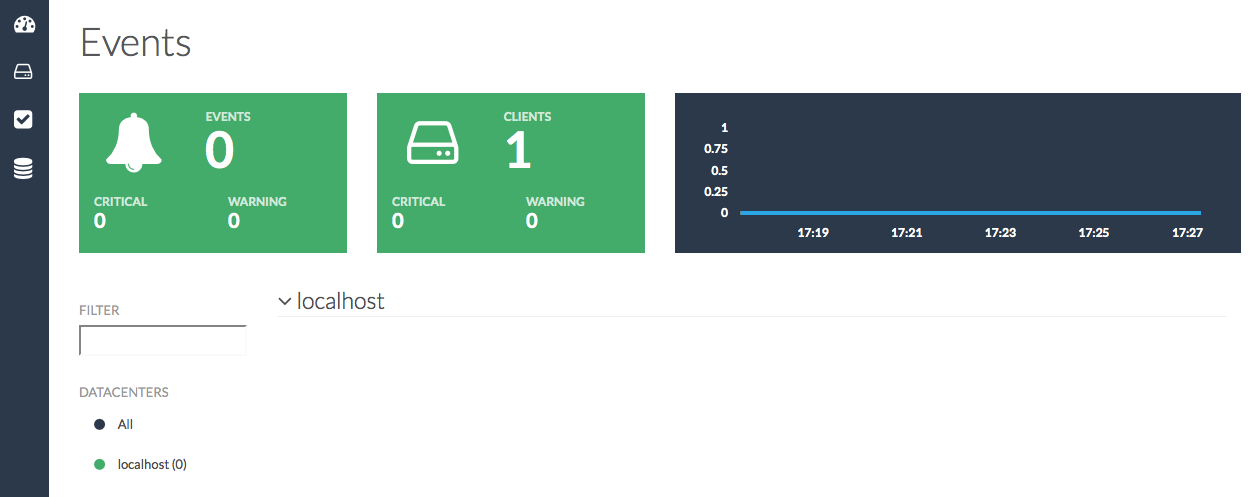
And you can now browse to http://address_of_your_server:3000, and login with the username “admin” and password “secret” (change these in /opt/mar/etc/uchiwa/config.js). You’ll see the following screen :
And there you have it! A very basic Sensu installation. Of course, it doesn’t actually monitor anything yet, but I’ll cover that in a future document. Any questions of feedback, just use the comments in this blog article. See you next time!