
My OS4 Development Environment
Updated:
It’s been a busy few months here, but I’ve still found time to enjoy my Amiga systems. I’ve been grabbing the odd hour here and there to continue my efforts setting up an Amiga development environment and “dip my toe in the water” again. My setcmd utility is progressing nicely and I’ve learned a lot about the tools like AmigaGuide and the Installer that I used on my A1200 back in the day. I thought since it’s been a while, I’d write a quick “brain dump” post and cover two of the big things I’ve finally got sorted out: Picking an editor, and getting Git working so I can publish and share my code.
NOTE : I’ve since published an updated article covering my development environment in 2023, check it out here.
Editors
There’s a huge selection of code editors available for the Amiga ranging from simple text editors to full-blown IDE systems, and everything in between. I started off using the built-in editor MultiEdit which was installed as part of the Enhancer Software pack from A-EON. This is a bare-bones editor but does have some nice features like the ability to open multiple files and so on - think of it like a “Notepad” on steroids:
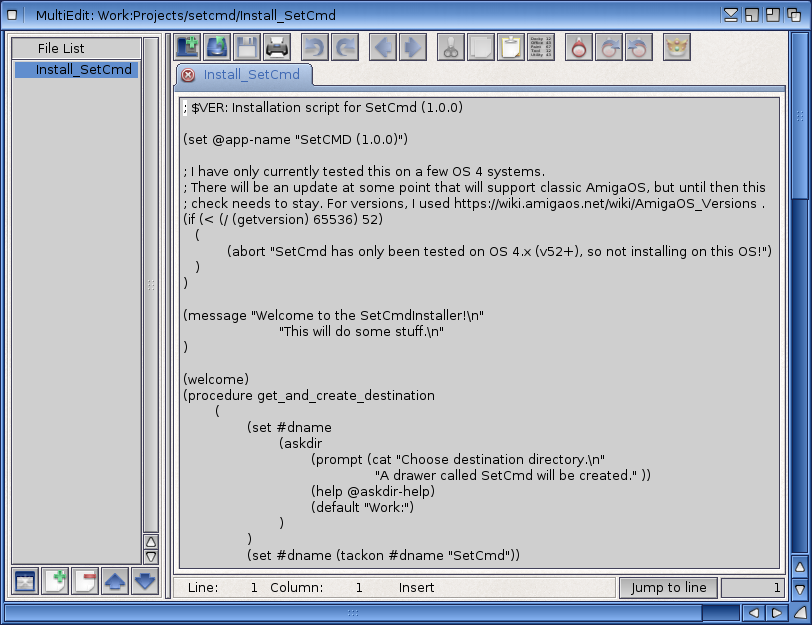
I did miss syntax highlighting and other advanced editing facilities, though.
CubicIDE
At the opposite end of the spectrum is CubicIDE. This is a full-blown IDE based around the GoldEd editor. Although it’s 68k-native software, it works perfectly under OS4 thanks to the built-in emulation in OS4. I purchased the full version which arrived on a CD-ROM and I also intend to install this on my A1200 when I get around to starting the port of my proof-of-concept setcmd shell script into Amiga C.
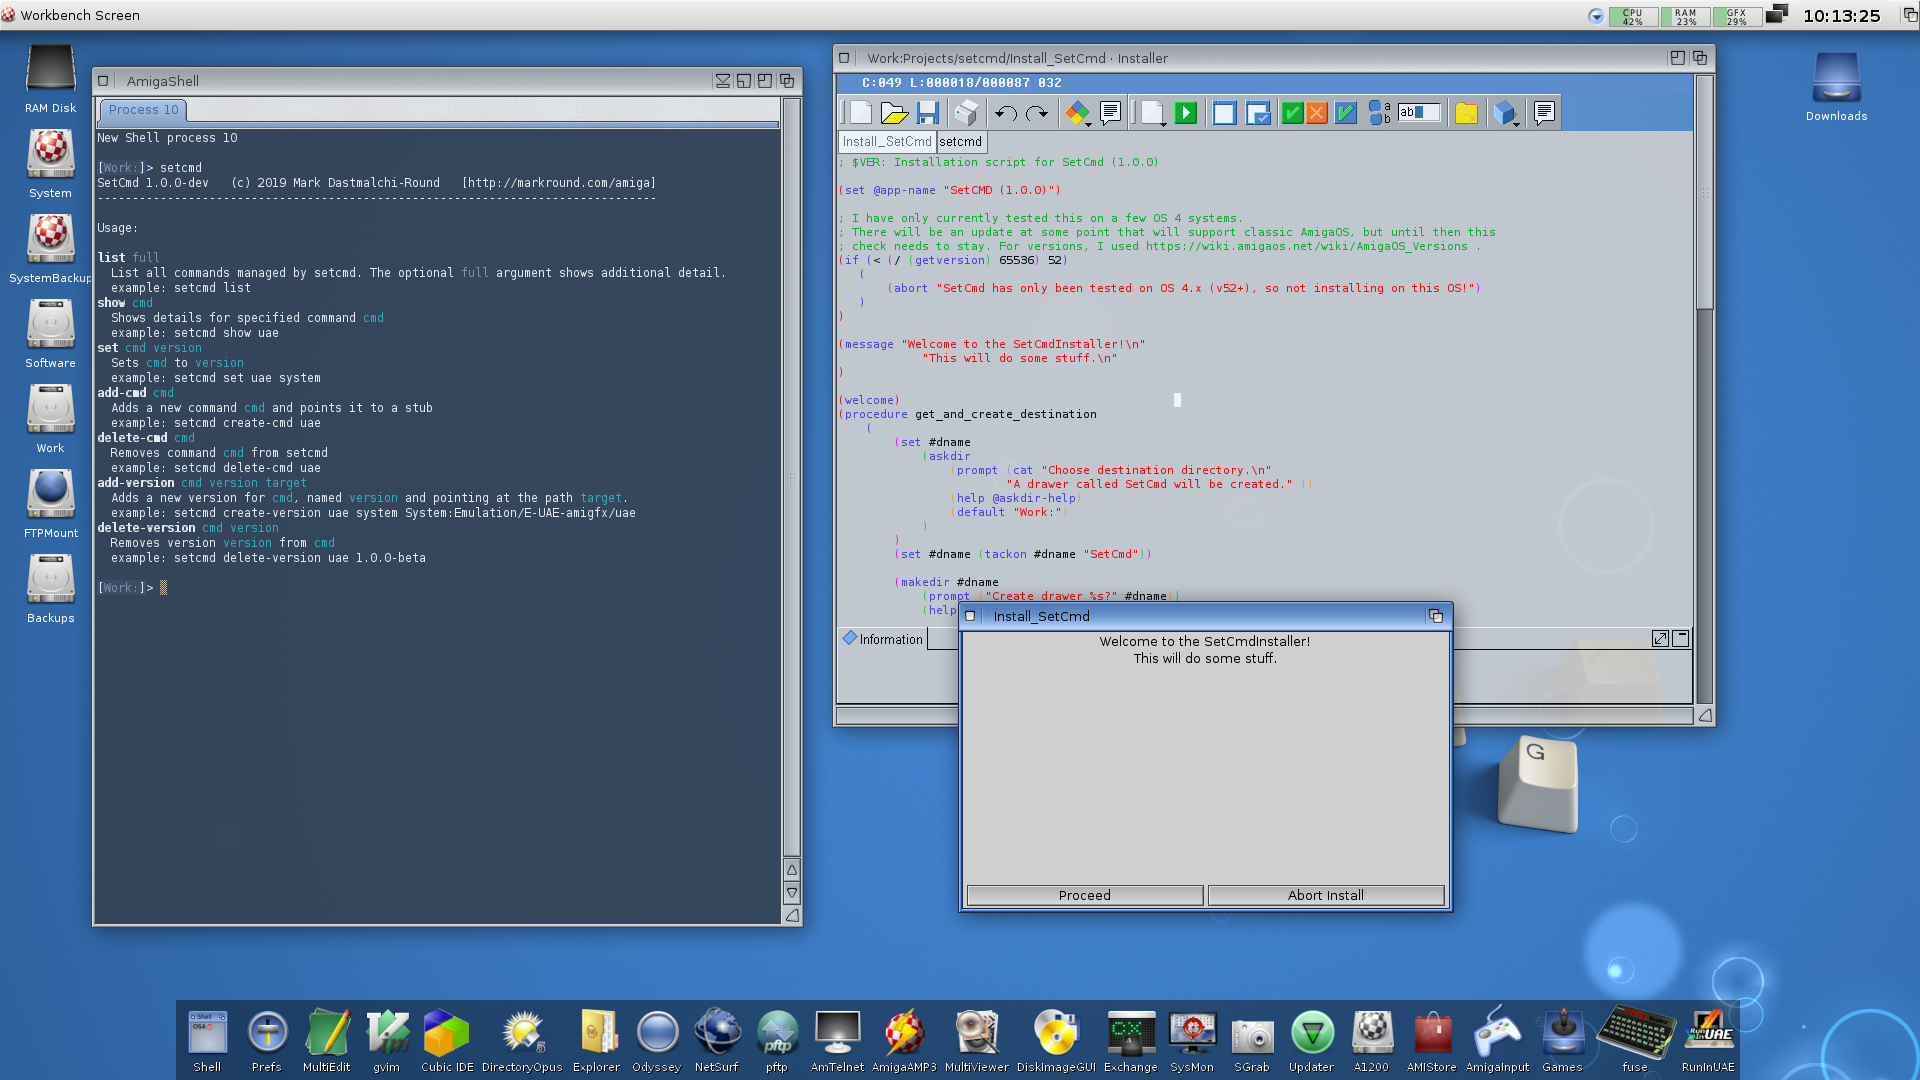
CubicIDE is very obviously geared mostly towards C development and includes a whole host of features around that but is still quite usable for shell programming. It also understands Installer scripts and provides some useful features, such as the ability to add commonly-used snippets such as dialog boxes and so on straight from a menu:
For my current stage of development though, it was overkill for editing and managing a shell-script based project. The syntax highlighting for AmigaDOS scripts was also a little basic, it only really seems to differentiate between comments, strings, and “everything else”. I’m still probably going to use it a lot later on when I get back into C development, but for now I needed something with more features than “MultiEdit” but not quite as advanced as an IDE.
VIM
OK, so some might say it’s “too Unixey”, but (Fun Fact Time!) VIM was actually first developed to bring vi to the Amiga. It’s been my editor of choice for years now due to my work with Unix-based systems and when I first got my X5000 I did try an old port of VIM. But I quickly discovered when run from the AmigaShell the terminal emulation wasn’t really up to scratch. I couldn’t get full-colour syntax highlighting working and various things just didn’t work as well as they do on other platforms, so I’d abandoned it as an option.
Back in May though, an updated version of VIM with a MUI user interface was uploaded to OS4Depot. This was an absolute game-changer for me - with a proper GUI and decent colour terminal emulation, VIM is now as usable (or not, depending on your point of view!) as it is on any Unix systems. It also feels like home to me and I can fly around it very efficiently.
Customising it is pretty much the same as it is on any other system. The documentation says that when you create a HOME: assign, VIM can look in there for a .vimrc file. So added the following in my S:User-Startup that points this to my Work: volume, which is essentially the equivalent of a Unix $HOME directory anyway:
ASSIGN HOME: Work:
With this in place, I could drop in my usual .vimrc (although I was sad to see that the netrw file browser is not supported under Amiga-like OSes) and I was off! It supports highlighting of pretty much any file I throw at it, although it doesn’t auto-detect AmigaDOS scripts. To resolve this, I enabled modelines in my Work:.vimrc file with the following additions:
set modeline
set modelines=5
And then added the following modeline near the top of my setcmd script:
; vim: set syntax=amiga ts=2 expandtab:
Here’s what a typical development session looks like for me now:
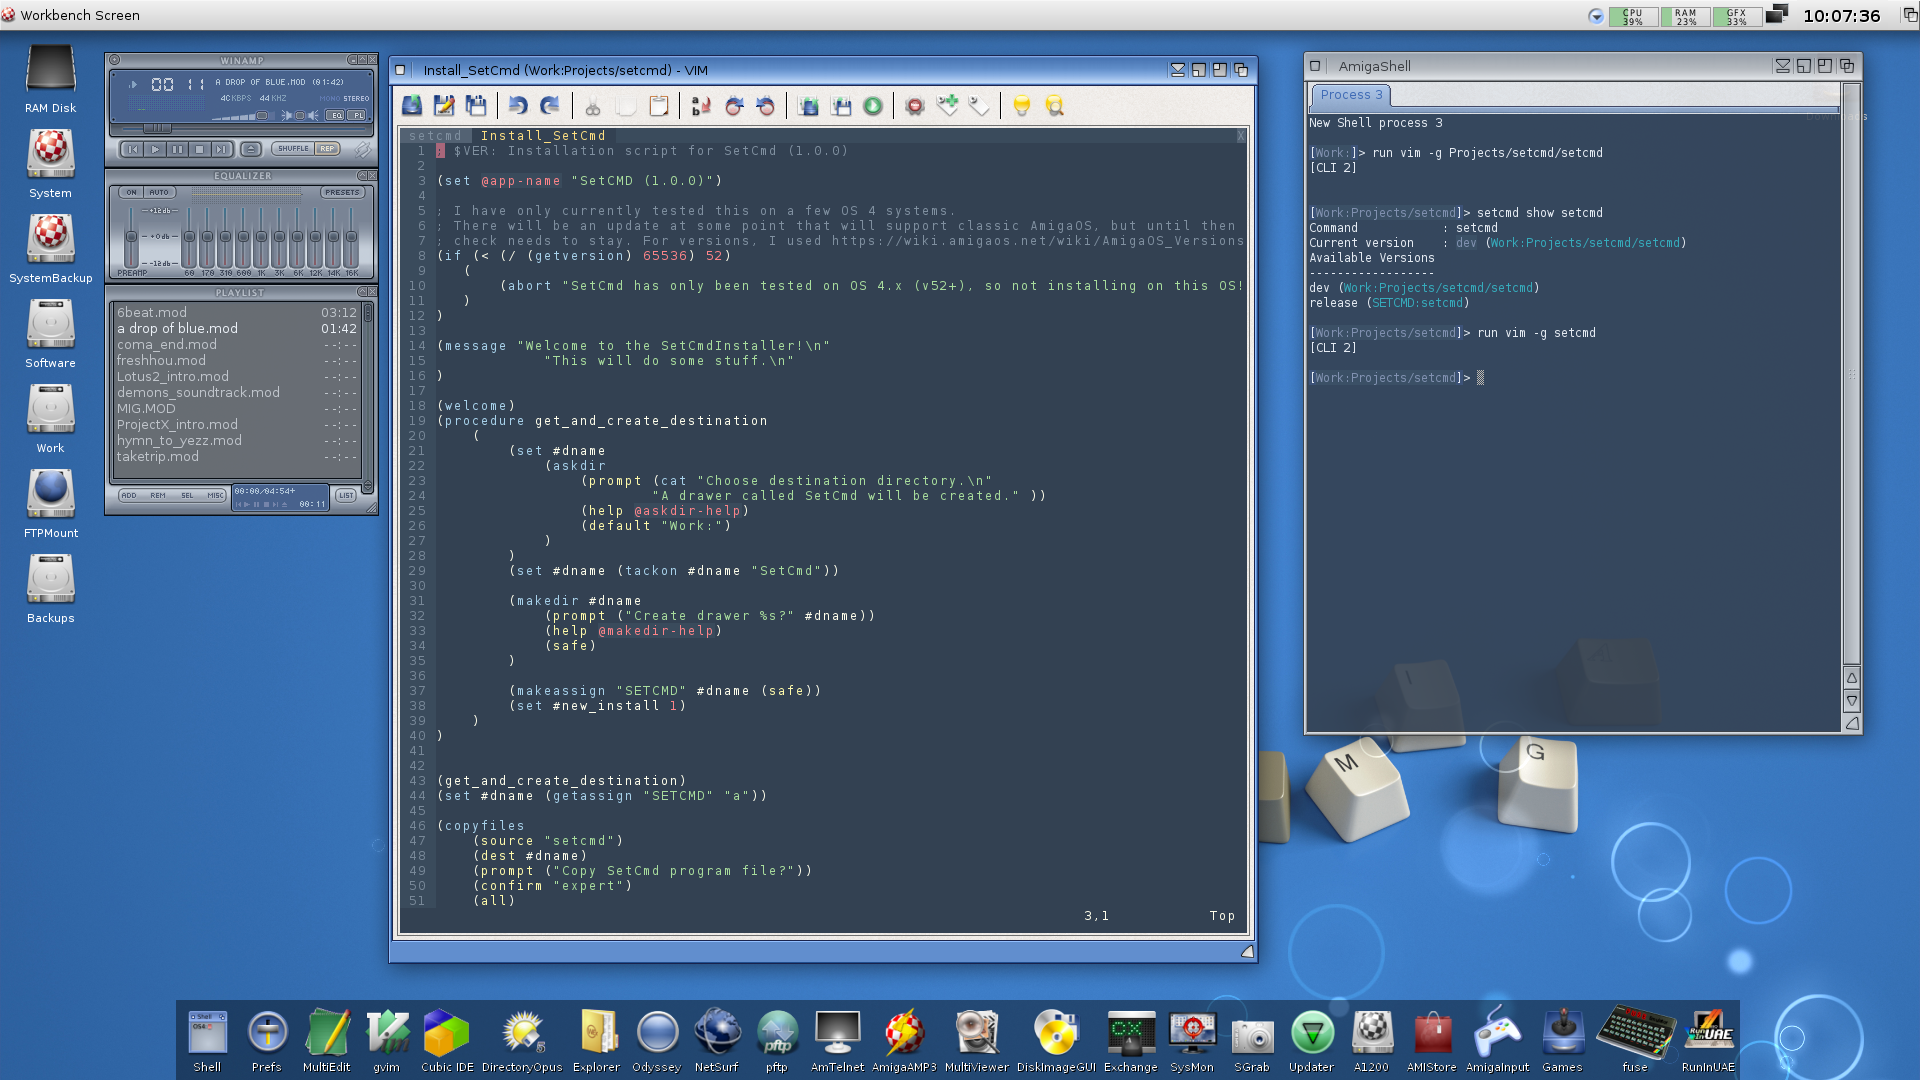
I have Vim running in graphical mode with a couple of tabs open, an AmigaShell session for testing and debugging and of course, AmigaAmp playing some classic MODs in the background. Bonus points to anyone who recognises where the currently playing track comes from ;)
I also spent some time making a nice dark colour theme for my AmigaShell to match the Gvim theme; while I did love the default grey and blue look of the shell for sheer retro appeal, I do much prefer working with this setup.
By the way, you may notice the background is slightly different in each of these shots - the little light-blue “bubbles” are actually drawn by CANDI which is part of the A-EON Enhancer Software pack. I remember the first time I clicked around some of the presets, I didn’t like any of the backgrounds so never really played much with it. But I then discovered that you can add your own backdrops, so now I have my favourite Amiga Keys wallpaper with lazily-drifting spheres over it. It’s really quite hypnotic, and very cool to watch!
So that’s what I’ve ended up on for now anyway. I’ll probably change my mind a dozen times in the next few months but for now I’m very happy with my setup and workflow :)
Git
Last time around, I had experimented with the sgit client to try and make use of Git. Sgit is available from OS4Depot (link below), but there’s now currently an effort by another developer to update it and then merge the changes back into the upstream project. If you’re interested, I suggest you subscribe to this thread on Amigans.net.
My goal with using sgit was really two-fold: I wanted version control for my own use (it makes development so much easier when you can track your code changes) and I’m already familiar with Git due to my work. But I also wanted to publish the source of my projects somewhere like GitHub so that they’re available to others. I feel very strongly that as much software as possible for the Amiga should be open-source by default, as there’s so much great software that has been published without the source available and then later abandoned. Which means that it’s effectively frozen in time and can never be updated, so we’re either forced to use old software or constantly re-invent things when a working solution has already been found. In an eco-system as small and fragmented as the Amiga Next-Gen platforms, this is ever more important. Anyway, I’ll get off my soapbox…
The good news is I got everything to work but it took a little trial and error on my part. I finally got it all playing nicely together, so for the benefit of others, here’s my steps:
Firstly, there’s a couple of things that need to be setup in the Amiga environment. I downloaded sgit from OS4Depot.net here and unpacked it into my Work:c directory. I do this to keep everything I download and add to the system separate from my System partition, so in my S:User-Startup I have a line which adds this directory to my path:
PATH Work:C add
As sgit uses a statically-linked (and somewhat old) OpenSSL build, you’ll need to set an environment variable telling it not to verify SSL certificates. I did this by adding the following line to my S:Shell-Startup script as I only ever use sgit from the command-line:
setenv GIT_SSL_NO_VERIFY 1
Not great from a security standpoint, but I’m just happy to have a working Git client at this point!
With those things in place, I was good to go. I did however discover that I couldn’t seem to create a new, empty project with sgit init and push it to a GitHub remote; each time I tried, CPU usage shot up to 100% and my system locked up. No idea what was going on there, but a workaround is to simply create a new repository through GitHub, then you can pull that and add to it once it’s been cloned to your system. For example, after I created a new repository for SetCmd, I cloned it:
sgit clone https://github.com/markround/setcmd.git setcmd
I could then change into the newly-created directory, and set the username and email address for commits:
cd setcmd
sgit config user.name MDR
sgit config user.email [email protected]
Then, I could add a file and commit it:
touch README.md
sgit add README.md
sgit commit -m "Added first file"
And finally, push it to the origin:
sgit push origin master
I then get prompted each time to enter my GitHub username and password - which turns out is not actually a password, but a developer access token. You’ll need to create one of these and then keep it safe somewhere as you’ll need it each time you push.
It would be nice if I could somehow cache this, but looking at the source for sgit, it looks like it’s currently not supported. No big deal though as it only happens when I interact with the remote end, and it looks like once I get a cross-compiling environment setup it would be fairly easy to add support for e.g. reading a token from an environment variable. I’ll see if I can do that at some point to help out with the project.
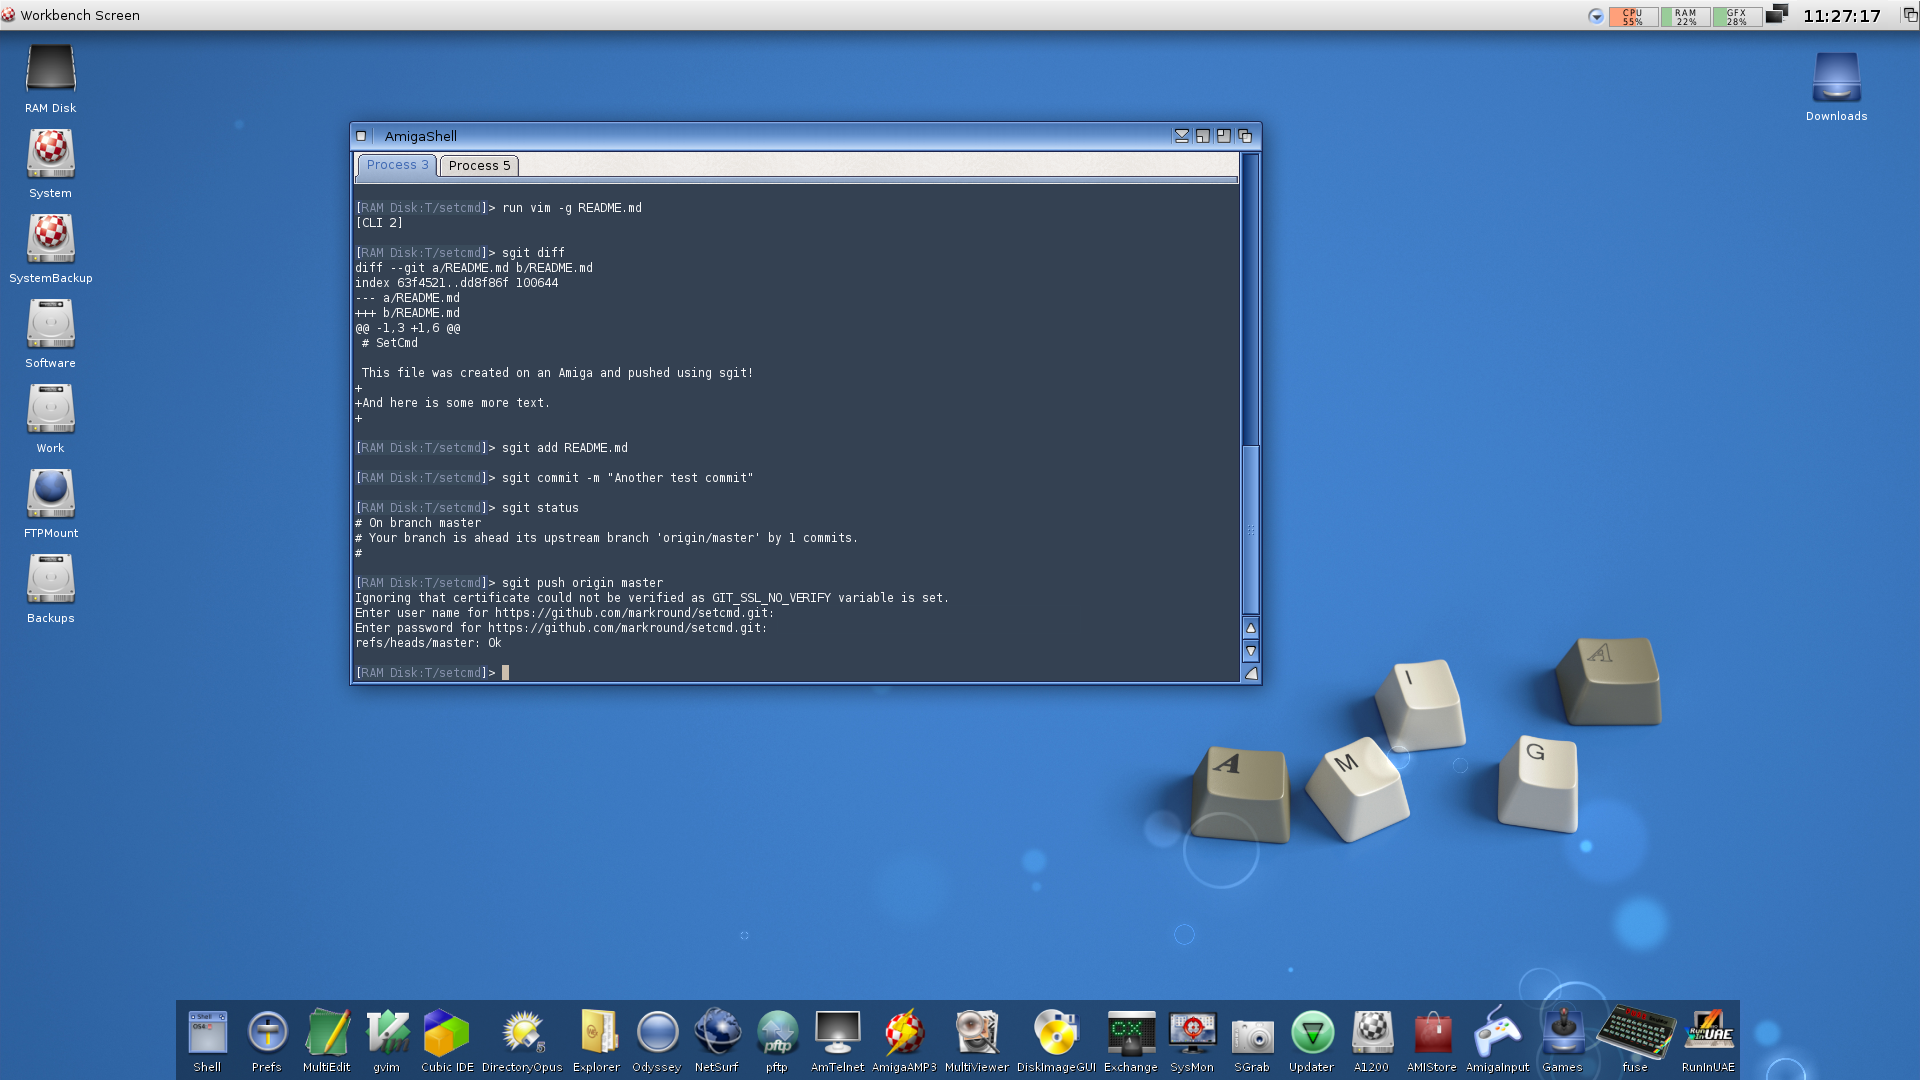
Here’s an example run from the AmigaShell showing some of the other sgit commands such as status and diff:
And the final proof - this is what I see in my browser from my Mac!
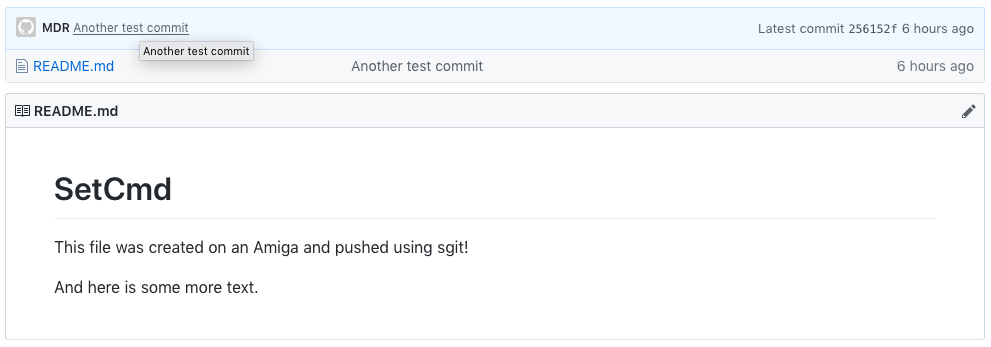
This is awesome. Once I’ve added a decent README.md and tidied up my code a bit, I’ll make the repository public and look at making a first proper release. Exciting times ahead!
To wrap up for now, I just want to say that modern developer tools such as a Git client, IDEs and editors are a real necessity for any platform to survive so I am very grateful to everyone working on these projects. Big fist-bumps to all involved in making all this possible :)
The opinions and views expressed on this website are my own and do not necessarily reflect the views of my employer, past or present.